Singleton Class in Java
In object-oriented programming, it is common to hear the term ‘class.’ The term Singleton class varies from these normal classes that we usually create. This class belongs to the five creational singleton design patterns present in Java. Throughout this article, you can explore and learn more about the Java Singleton class.
Singleton class in Java:
A singleton class is nothing but a class that lets the presence of only one object at a time. It provides a global point of access to that instance. In simple terms, the class must
contain only an object that is created and is shared by all other classes.
What is a singleton pattern in java?
When an application wants to have only one instance of any class, the concept of Singleton as a design solution comes into action. It makes sure that there are no exceptional cases that serve as a reason to bring in another object.
Purpose of Java Singleton class:
As mentioned earlier, the main purpose of the singleton class is to restrict many numbers of instances from being created. The limit is set to 1. Due to this, we can save a lot of memory space as the object creation takes place only on a request.
Repeated usage of the same object works well with multi-threaded and database applications in Java. Caching, configuration settings, logging, thread pooling any more tasks become simple to handle.
Designing a singleton class in Java:
Starting with, we must declare the constructor of the Singleton class using a private keyword. By this, we restrict other classes from creating objects.
As we create only one instance, we must give it global access. To achieve this, follow the given steps.
1. Declare all the constructors of the class as private.
2. Use the lazy initialization concept to create static methods.
3. Store the object as a private static variable.
You can also look into some existing examples of singleton classes like Action Servlet, Runtime class and Service Locator.
How does a normal class differ from that of a Singleton class?
The biggest difference between a normal class and a singleton class is the initiating of the object. The initiation for a normal can take place using a class’s object. Whereas a singleton class is initiated using the getInstance() method.
Another difference is that once the lifecycle of an application ends, the normal class gets destroyed. In contrast, a singleton class does not vanish at the end of a lifecycle.
Implementation of the difference between a normal class and a singleton class:
Let us not look at an example to understand the difference between a normal class and a singleton class:
In the sample program given below, the difference lies in the instantiation process. In a normal class program, a constructor is used to achieve this. Whereas in a singleton class, the getInstance() does this task.
// Program to implement Singleton class using getInstance() method
class Singleton{
private static Singleton single_obj = null;
public String str;
private Singleton(){
str = “Learn Java with FirstCode”;
}
public static Singleton getInstance(){
if(single_obj == null)
(single_obj = new Singleton();
return single_obj;
}
}

class FirstCode{
public static void main(Sting args[]){
Singleton a = Singleton.getInstance();
Singleton b = Singleton.getInstance();
Singleton c = Singleton.getInstance();
System.out.println(“The Hashcode for a is:” + a.hashCode());
System.out.println(“The Hashcode for b is:” + b.hashCode());
System.out.println(“And The Hashcode for c is:” + c.hashCode());
if (x==y && y==z){
System.out.println(“The three objects are directed towards the same memory location”);
}
else{
System.out.println(“The three objects are not directed towards the same memory location”);
}
}
}
Output:
The Hashcode for a is: 666829154The Hashcode for b is: 666829154
And The Hashcode for c is: 666829154
The three objects are directed towards the same memory location
Output explanation:
As soon as the getInstance() method is called in a singleton class, it creates an object named single_obj and returns it to the variable. The single_obj is static and is no more a null value. When the getInstance() method is called again, it does not initiate as single_obj contains a value. Thus, it is returned to the variable by executing the if block.
Inside the main class FirstCode, the singleton class is instantiated with three objects x, y, and z. This takes place by calling the getInstance() method. Once object a is created, the rest b and c are directed towards object a. therefore, changing the values of object a will affect the other values too. This change is reflected in the output.
Let us now look into another example by implementing the Singleton class that has the same method name as its class name.
Example 2:
class Singleton{
private static Singleton single_obj = null;
public String str;
private Singleton(){
str = “Learn Java with FirstCode”;
}
public static Singleton Singleton(){
if(single_obj == null)
(single_obj = new Singleton();
return single_obj;
}
}

class FirstCode{
public static void main(Sting args[]){
Singleton a = Singleton.Singleton();
Singleton b = Singleton.Singleton();
Singleton c = Singleton.Singleton();
a.str = (a.str). toLowerCase();
System.out.println(“The String a is:” + a.str);
System.out.println(“The String b is:” + b.str);
System.out.println(“And The String c is:” + c.str));
System.out.println(“\n”);
z.str = (z.str). toUpperCase();
System.out.println(“The String a is:” + a.str);
System.out.println(“The String b is:” + b.str);
System.out.println(“And The String c is:” + c.str));
}
}
Output:
The String b is: learn java with firstcode
And The String c is: learn java with firstcodeThe String a is: LEARN JAVA WITH FIRSTCODE
The String b is: LEARN JAVA WITH FIRSTCODE
And The String c is: LEARN JAVA WITH FIRSTCODE
Output Explanation:
Once the Singleton()method is called, it creates an object of name single_obj and returns it to the variable. As it is static, it gains a value and is no more null. Again when the Singleton() method is called, the object single_obj returns a value and is not null. This happens as it does not instantiate the Singleton class again.
Forms of Java Singleton class pattern:
There are two forms of a singleton class:
- Early Instantiation: When the object creation takes place during the load time.
- Lazy Instantiation: When the object creation takes place when it is actually required.
1. Java Early instantiation:
During early instantiation, we usually create the object of the class while we declare the static variables. Here, the instance is created during classloading.
Sample program to implement singleton design pattern using early instantiation:
class FirstCode{
public static FirstCode fc = new FirstCode();
private FirstCode(){}
public static FirstCode method1(){
return fc;
}
public void method2(){
//statements
}
}
2. Java Lazy instantiation:
During lazy instantiation, we create the object in a synchronized block or method. Here the object is created when the necessity occurs.
Sample program to implement singleton design pattern using lazy initialization:
class FirstCode{
private static FirstCode fc;
private FirstCode(){}
public static FirsstCode method1(){
if(obj==null){
synchronized(Singleton class){
if(obj ==  null){
obj = new Singleton();
}
}
}
return fc;
}
public void method2(){
// statements
}
}
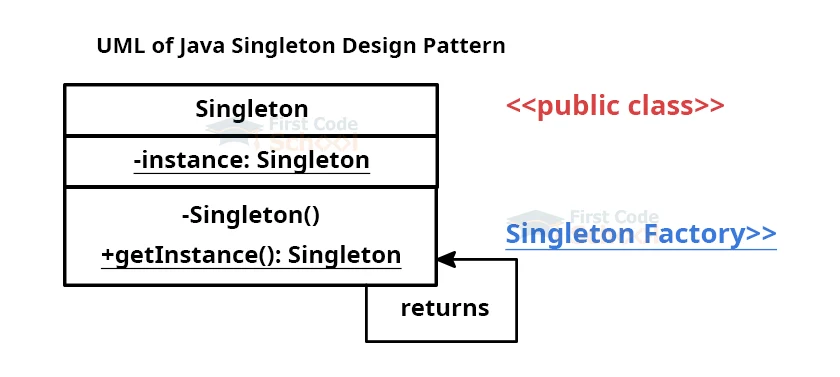
UML of a Singleton Design Pattern:
Significance of Classloader in Singleton Pattern:
When there are two classloaders involved in loading a singleton class, this class creates two instances, one for each classloader.
Importance of Serialization in Singleton Pattern in Java:
When a singleton class is serializable, it means that the singleton instance can be serialized too. When serialization takes place, deserialization can also happen. In this case, it will not return the singleton object after serialization.
The better way to deal with this issue is by overriding the readResolve() method. Once the instance deserialization takes place, we can call this method to return the object of the singleton class.
public class FirstCode implements Serializable{
//statements
protected Object readResolve(){
return method1();
}
}
A real-time example of Java Singleton pattern:
This example revolves around creating a JDBCSingleton class. This class consists of the constructor as private and private static object jdbc of itself.
The JDBCSingleton class provides a static method to attain its static object. Here, the JDBCSingletonDemo class will make use of the JDBCSingleton class to attain the JDBCSingleton instance.
Implementation of Java Singleton class:
The programmers have various ways to design and implement a Singleton class. Some of the most used methods are:
- Eager Initialization Method
- Lazy Initialization Method
- Thread Safe Singleton Method
- Lazy Initialization with Double Lock Method
- Lazy Load Method
- Static Block Initialization Method
- Bill Pugh Implementation Method
- Singleton using Enum
1. Eager Initialization Method in java:
In this pattern, we create the instance for the class well in advance before it is actually required. It is done on system startup. Therefore, here we create an object regardless of noting whether any class demands it or not.
Steps to create a Singleton class using the Eager Initialization method:
- Firstly, declare the constructor of the class as private.
- Create a private class member for this class.
- Then, give a definition for the factory method that returns the instance of this class.
Sample code to implement Eager Initialization Method:
public class FirstCode{
private static FirstCode obj = new FirstCode();
public String str;
private FirstCode(){
str = "Learn Java with FirstCode";
}
public static FirstCode getInstance(){
return obj;
}
public static void main(String args[]){
FirstCode note = FirstCode.getInstance();
System.out.println("Entered String:");
System.out.println(note.str);
System.out.println("String in Lower Case:");
note.str = (note.str).toLowerCase();
System.out.println(note.str);
}
}
Output:
Entered String:Learn Java with FirstCode
String in Lower case:
learn Java with firstcode
As you can see, the getInstance() method is used to instantiate an object instead of invoking the constructor class.
Pros:
It is the simplest technique to implement.
Cons:
- We are not sure if the object is required or not. As it is created without a need, this leads to wastage of storage.
- Even CPU time gets wasted on instance creation when not in need.
- This approach prevents us from using Exception Handling.
2. Lazy Initialization Method in java:
To overcome the drawback of creating an unwanted object in the Eager Initialization Method, we skip to Lazy Initialization Method.
This method instantiates a class only when it is needed. Therefore, it eliminates the unnecessary creation of instances.
Steps to create a Singleton class using the Lazy Initialization method are:
- Firstly, declare the constructor of the class as private.
- Create a private static object for this class without initializing it.
- Then, create a factory method. It should first check if the instance is null or not. If it is null, no object will be created; otherwise, it will create an object of the singleton class.
Sample code to implement Lazy Initialization Method:
public class FirstCode{

private static FirstCode obj;

public String str;

private FirstCode(){

str = "Learn Java with FirstCode";

}

public static FirstCode.getInstance(){

if(instance == null){

instance = new FirstCode();

}

return instance;

}

public static void main(String args[]){

FirstCode note = FirstCode.getInstance();

System.out.println("The Given String is:");

System.out.println(note.str);

}

}
Output:
The Given String is:Learn Java with FirstCode
Pros:
- The object is created only when needed, and this a lot of CPU memory space too.
- Exception Handling is possible to take place in this technique.
Cons:
- Checking for the null condition each time is tedious.
- Accessing the class object directly is restricted.
3. Thread Safe Singleton Method in java:
The Thread-safe singleton method lets us create a singleton class in a multi-threaded environment. To avoid multiple thread access taking place simultaneously, we need to declare the getInstance() method as synchronized.
Sample code to implement Thread Safe Singleton method:
public class FirstCode{

private static FirstCode obj;

private FirstCode(){}

public static synchronized FirstCode getInstance(){

if(instance == null){

instance = new FirstCode();

}

return instance;

}

}
Pros:
- It is thread-safe.
- The lazy Initialization method is also possible with it.
Cons:
Synchronization of the getInstance() slows down the performance of the application. This is due to restricting multiple threads to access simultaneously.
4. Lazy Initialization with Double Lock Method in java:
Here the problem of synchronized methods is resolved. The synchronization of the getInstance() method does not take place. Instead, we enclose the code for creating the objects inside a synchronized block.
In this case, only a minimum number of threads would need to wait during its commencement. Thus, the application’s performance is high.
Sample code to implement Lazy Initialization method using Double Locking:
public class FirstCode{

private static FirstCode obj;

private FirstCode(){

str = "Learn Java with FirstCode";

}

public static FirstCode.getInstance(){

if(instance == null){

synchronized (FirstCode.class){

if(instance == null){

obj = new FirstCode();

}

}

}

return obj;

}

public static void main(String args[]){

FirstCode note = FirstCode.getInstance();

System.out.println("The String is:");

System.out.println(note.str);

System.out.println("The String in Lower case is:");

note.str = (note.str).toLowerCase();

System.out.println(note.str);

}

}
Output:
The String is:
Learn Java with FirstCode
The String is Lower case is:
learn Java with firstcode
Pros:
- Implementation of the Lazy Initialization method is also possible.
- It is a thread-safe method.
- Synchronized block leads to better performance.
Cons:
The performance gets affected a bit in the starting.
5. Lazy Load method in Java:
In the Lazy Load method, the Java Virtual Machine or the JVM loads static variables only when they are needed. During the JVM’s loading of the singleton class, the object is not created.
Sample program to implement the Lazy Load Method:
public class FirstCode{

private FirstCode(){}

private static class SingletonClassHolder{

private static FirstCode obj = new FirstCode();

}

public static FirstCode.getInstance(){

return SingletonClassHolder.obj;

}

}
6. Static Block Initialization Method in java:
The Static Block Initialization Method comes from the Eager Initialization method. The slight difference takes place when the object is created inside a static block in this method. Due to this, access to the object is not restricted.
Exception Handling is also possible in this method. Therefore, it is very much useful when we are aware of facing exceptions during object creation.
Sample program to implement Static Block Initialization method:
public class FirstCode{

private static FirstCode obj;

private FirstCode(){}

static {

try {

obj = new FirstCode();

}

catch (Exception e){

throw new RuntimeException("Exception encountered during the creation of Singleton Class");

}

}

public static FirstCode.obj(){

return obj;
}
}
Pros:
- It is easy to implement.
- The getInstance() method is not required.
- Easy to handle exceptions in static blocks.
Cons:
- As in the Eager Initialization method, the resources are wasted when the creation of an object takes place unnecessarily.
- Wastage of CPU time also takes place due to the needless creation of instances.
7. Bill Pugh Implementation Method in java:
The drawbacks in the memory model of Java 5 led to the failure of the Singleton class in some scenarios. This took place mostly in the multi-threaded environment.
Bill Pugh found a solution for this. He implemented the idea of inner static classes in Singleton. Therefore, this method is named as Bill Pugh Implementation method.
Sample code to implement Bill Pugh method:
public class FirstCode{

private FirstCode(){}

private static class BillPughSingleton{

private static final FirstCode obj = new FirstCode();

}

public static FirstCode.getInstance(){

return BillPughSingleton.obj;

}

}
8. Singleton using Enum in Java:
It uses enum to provide implicit support for thread safety. Only one instance can be created in this case. Using Java enum singleton is one of the best methods to create a singleton class with less effort.
Sample code snippet to implement enum in singleton class:
public enum FirstCode{

obj;

public void method1(String var1){

}

}
Which method should I pick?
Getting to know all these seven incredible methods, you might be a bit confused to pick one when required. Understanding the pros and cons of each method would help you choose the right one accordingly. Here are a few more jotted tips:
- The usage of the Eager initialization method is applicable only if the initialization cost is affordable regarding the resources.
- To use Exception Handling along with the Eager Initialization method, the Static block in Eager Initialization will help. This technique also lets us control the objects.
- The Double-Check Locking mechanism comes into action when we need to create a Singleton class to work in a multithread environment.
- The last method, Bill Pugh Implementation, is extensively used for the singleton classes. It becomes the preferred method by the programmers comparatively.
You can pick the method you need according to the specific requirements you need to resolve.
Conclusion:
This article would have given you a clear-cut tutorial about the Singleton class and its related concepts in Java. You can now design your singleton class without any issues or errors. The sample programs would lend you a helping hand to understand the coding structure to implement these methods. Dive deep into Singleton classes practically.